Dairy Free Broccoli Soup

Brocolli_Soup

I am sitting here watching it snow again (yes it is April, yes we should be enjoying some warm spring days and yes abnormal weather is the norm in Colorado). Someday here we will warm up and I will get to wear shorts (or at least short sleeves) as well as I will get to start using the bbq again. For now, I am spending another cold and snowy day inside making yummy soup for dinner. I have been on a veggie soup kick for quite some time now. Veggie soups make vegetable nutrition super easy for me, so today I decided to visit another one of my veggie soup staples: broccoli soup. This was a recipe we found in the newspaper when I was in elementary school (yes, the newspaper was that paper thing that showed up on your driveway every morning and it used to be the only way to see the daily comics☺). We found this recipe to be super yummy, and it was easy to make dairy free.

2 tbsp butter or margarine or olive oil
1 cup chopped onion
3 cloves garlic, minced
1 ½ tsp basil
2 tsp thyme
6 cups chopped broccoli
4 cups vegetable stock or water (or you could probably use chicken stock)
1 tsp salt
fresh ground pepper to taste

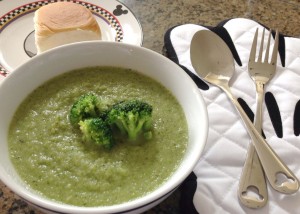
In a 4-qt dutch oven add the butter or margarine and heat on medium-low heat. When hot, add the onions and cook a few minutes until translucent. Add in the garlic, basil and thyme. Allow to cook for a few minutes, then add the broccoli. Saute until the broccoli is tender. Mix in the vegetable stock or water and allow to heat. Using an immersion blender, mix the soup until smooth right in the pot. (The mixture can also be blended in a couple batches using a blender, then returned to the pot). Adjust the heat to low and add the salt and pepper. Allow the soup to heat again for several minutes before serving.

This soup is great because it is an easy do-ahead for dinner. The soup can remain on the stove over low heat while you finish the rest of dinner and it is not time sensitive. FYI, when I make this soup, I usually take out a few of the cooked broccoli florets and save them to garnish the soup bowls. A nice tip for this soup: it is wonderful with fresh broccoli when it is in season, or inexpensive. However, it is just as good with frozen broccoli in winter months. You can also use frozen chopped onions if you have those in your freezer. I kind of enjoy making this soup with sweet onions when I can find them. Of course, if you use olive oil and vegetable stock or water, this soup is an easy vegan recipe. My husband loves black pepper, so he always adds more to his soup, or sometimes he adds a little cayenne pepper to add some kick. I am sure there are several other spices that could be added to vary this soup, but I love the original recipe and rarely end up varying this soup!
Toothless_SignatureJaime

Orange Brownies

Orange_Brownies

Over the years I have become very good at altering recipes so that I can make them around my food allergies. Even though I can alter almost any recipe, often the best are those that don’t require any altering. I tend to get excited when I find something that I can eat right off the bat. How cool is it to find a brownie recipe that I can eat without any changes? These blond brownies are great because there is no chocolate or cocoa to try to substitute or eliminate. For me, it is exciting to find a brownie recipe that does not require any chocolate, since I have never had real chocolate and I am not a fan of cocoa or chocolate flavored baked foods. This wonderful orange brownie recipe originated from Paula Dean and the recipe can be found on foodnetwork.com.

Orange Brownies

1 ½ cups all-purpose flour
2 cups granulated sugar
1 tsp salt
1 cup (2 sticks) softened butter or margarine
2 tsps pure orange extract
1 tsp grated orange zest

Preheat the oven to 350 degrees and then grease a 13x9x2 inch pan. Stir together the flour, sugar and salt in a large mixing bowl. Add in the butter, eggs, orange extract, and orange zest. Beat until well blended with a hand held mixer. Pour the batter into the prepared pan. Bake for 30 minutes or until golden brown and well set. Allow brownies to cool completely before slicing into squares.

There is a cream cheese frosting that can be used with this recipe. However, I love these brownies just as is; they are plenty sweat and yummy without any topping or frosting. I am sure you could also use a simple butter cream frosting with a little orange flavoring if you really want to frost these beauties. I also highly recommend trying these brownies with a little bit of vanilla rice dream. Enjoy!!

Toothless_SignatureJaime

Toothless Cooking Tools

Favorite_Tools

Today I thought instead of looking at a recipe, I figured I would share all the wonders of my two favorite kitchen gadgets. I am still learning how to cook for me (the toothless one) and my husband, the carnivorous and toothy-one. I have found a couple of wonderful kitchen tools that help me to make meals that I can eat (without having to put my whole plate in the blender) and that keep my husband happy. He will eat anything I make, but I would feel bad if every single thing I made was mush, plus I couldn’t stand that either.

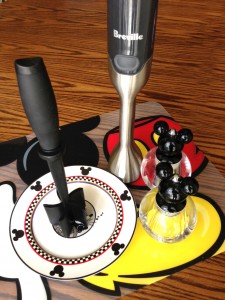
My first gadget that is a must have for any household with somebody on a soft (toothless or no chew) diet is simply called a Mix n Chop. The one we have is a pampered chef version, but these gizmos can be found at cooking stores and online. I have seen giant versions of this tool used on some of my favorite cooking shows too. Did you ever wonder how to get ground beef finely smushed for entrees like tacos or spaghetti? Any Mexican restaurant we eat at always seems to have such fine ground beef. I had tried putting it in my little chopper after I had browned it, and the beef just gets this nasty texture that is not appetizing. This little black gadget is the answer. As you can see from the above picture, this little black tool has curved paddle type blades on the bottom. I simply use it to smash up the ground meat in the pot while I am browning it. This allows me to get all the ground meat into smaller than pea size pieces (it also allows me some anger management time ☺). This helps me a ton because then I never get that random grape or almond sized chunk inside my burrito that I have to try to gum to death. This tool is also dishwasher safe, which makes me even happier. I use my smasher friend on ground meats in Mexican food, hamburgers, meatballs, soups and Italian meat sauces. This little tool really has been a game changer for me!

My second essential kitchen gadget is my immersion blender, also known as a stick blender. These little guys are available all over. They can be found locally at places like Target and Kohl’s as well as at high end cooking stores and of course online. There is quite a bit of variation in these tools as far as quality of construction and attachments. This also means there is a lot of variation in price. I have had three of these guys, in the period of about a year. My first one had a plastic base and was very inexpensive. That was not a great investment as the plastic cracked after just a few uses, which allowed soup to get inside the housing and ickyness followed. Version two had several different attachments on the bottom with different blades. The problem with this guy was the place where those attachments clipped on, also did not seal, so there was ick pretty quick on that blender. My current favorite is the Breville (pictured above) and I love it. This one cost a lot more but it is so worth it. It had a plastic bottom lining to protect the coating on my non-stick pots. The whole lower half of this blender is stainless steel and it is all sealed. So no more ick getting into the blender! This version also has different speeds, so I have the ability to very gently blend dessert items, or I can throw down the hammer on pots of stew or pasta sauces. Quick note, immersion blenders do not seem to have the same effect on potatoes as a food processor, so fear not if you are blending a dish with tomatoes.

I could not cook without my immersion blender. It seriously has changed the way that I cook because I can use it in almost any container. I use this tool to blend my veggie soups right in the pot as well as I can slightly blend meat sauces to make them a little more smooth (great for spaghetti sauces with big chunky tomatoes). It is perfect because I control how blended the dish become; I can blend until it is totally smooth, or I can leave some texture and small chunks behind. This tool is also a lifesaver for me on nights when my mouth is just really sore and my gums hurt too much to keep trying to gum that beef stew or pot roast or other dish. I can simply use my immersion blender right in my bowl of stew or on my pot roast, carrots and potatoes and smush it just enough that I can simply swallow the food, but it still has texture and taste and it does not look like baby food. The only drawback is that the blender part is not dishwasher safe, but I will happily hand wash this guy, for all of the help that is has given me!!

Toothless_SignatureJaime

Fresh Tomato Soup

Tomato_Soup

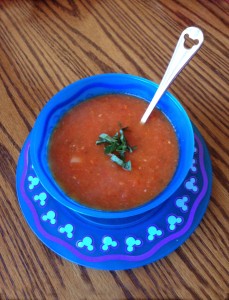
Since dealing with cancer, I have become a lot more aware of the nutrition in foods. I have also had to concentrate more on packing all the nutrition that I can into any dish I make. I can only eat small portions of food per sitting, so for me it’s important to make every bite count. The one thing that seems to work very well for me is vegetable soups. Veggies can be difficult to eat because they take lots of chewing, or I have to cook them until they are dead and mushy which is no fun. Blended veggie soups are great, because it removes the chewing element and there is still all that great veggie nutrition and fiber. I shared my butternut squash soup earlier, and today I am going to share my version of a tomato soup (this original recipe was from Foodnetwork.com). This soup is great in the summer when tomatoes are cheap, or when your garden suddenly provides pounds of tomatoes all at once. Maybe the best thing about this recipe is that my husband, who hates tomato soup, really likes this one! It helps that there are several veggies in here, so it is not just plain tomato soup!

3 tbsp olive oil
1 ½ cups chopped red onions (about 2 onions)
4 carrots, peeled and chopped
1 tbsp minced garlic (3 cloves)
4 pounds of vine ripened tomatoes, coarsely chopped (5 large)
1 tbsp sugar
1 tbsp tomato paste
¼ cup packed fresh basil leaves (plus some julienned basil for garnish)
4 cups vegetable stock
2 tsp kosher salt
1 tsp freshly ground black pepper

Heat the oil in a large dutch oven, or soup pot over medium-low heat. Add the onion and carrots and sauté for ten minutes or until tender. Add the garlic and cook for a minute. Stir in the tomatoes, sugar, tomato paste and the basil. Add in the vegetable stock, salt and pepper. Stir well and bring the soup to a boil. Then lower the heat and simmer for 45 minutes until the tomatoes are tender. Process the soup with an immersion blender, normal blender or food mill, depending on how chunky or smooth you want your soup. Reheat the soup over low heat. Serve with julienned basil as garnish. You can also garnish and serve with croutons, fried onions or crusty French bread if desired.

This soup is wonderful with any kind of tomatoes I have tried. I usually pick whatever type of tomatoes look good in the store that week, whether that is vine ripened, roma or heirloom. I also tend to use whatever kind of onions I happen to have around, which can be yellow, sweet, Vidalia or red. Once the soup is blended it is also easy to add small soup sized pasta to add some extra nutrition and bulk to this soup. I love adding about ¼ cup of orzo or stelline pasta. Heads up, you may have to add a little extra stock or water if you add pasta. I love making this version of tomato soup because I know that it has so much more nutrition than a can of condensed soup (and it has less salt). I also love that I can get my husband to eat his one! ☺

Toothless_SignatureJaime