Dairy Free Broccoli Soup

Brocolli_Soup

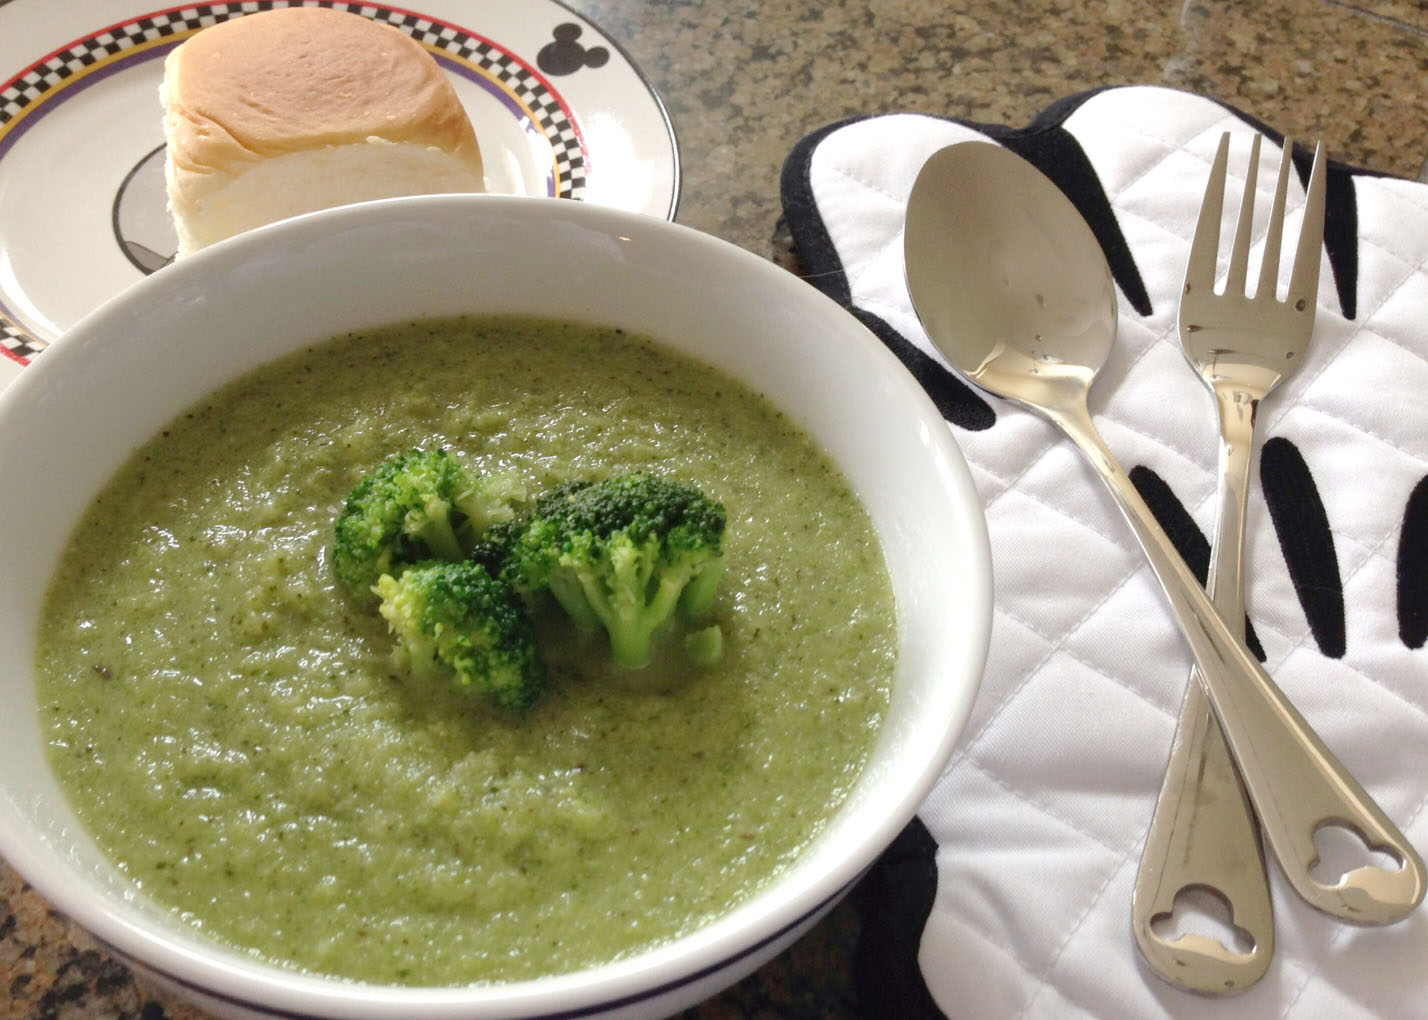
I am sitting here watching it snow again (yes it is April, yes we should be enjoying some warm spring days and yes abnormal weather is the norm in Colorado). Someday here we will warm up and I will get to wear shorts (or at least short sleeves) as well as I will get to start using the bbq again. For now, I am spending another cold and snowy day inside making yummy soup for dinner. I have been on a veggie soup kick for quite some time now. Veggie soups make vegetable nutrition super easy for me, so today I decided to visit another one of my veggie soup staples: broccoli soup. This was a recipe we found in the newspaper when I was in elementary school (yes, the newspaper was that paper thing that showed up on your driveway every morning and it used to be the only way to see the daily comics☺). We found this recipe to be super yummy, and it was easy to make dairy free.

2 tbsp butter or margarine or olive oil
1 cup chopped onion
3 cloves garlic, minced
1 ½ tsp basil
2 tsp thyme
6 cups chopped broccoli
4 cups vegetable stock or water (or you could probably use chicken stock)
1 tsp salt
fresh ground pepper to taste

In a 4-qt dutch oven add the butter or margarine and heat on medium-low heat. When hot, add the onions and cook a few minutes until translucent. Add in the garlic, basil and thyme. Allow to cook for a few minutes, then add the broccoli. Saute until the broccoli is tender. Mix in the vegetable stock or water and allow to heat. Using an immersion blender, mix the soup until smooth right in the pot. (The mixture can also be blended in a couple batches using a blender, then returned to the pot). Adjust the heat to low and add the salt and pepper. Allow the soup to heat again for several minutes before serving.

This soup is great because it is an easy do-ahead for dinner. The soup can remain on the stove over low heat while you finish the rest of dinner and it is not time sensitive. FYI, when I make this soup, I usually take out a few of the cooked broccoli florets and save them to garnish the soup bowls. A nice tip for this soup: it is wonderful with fresh broccoli when it is in season, or inexpensive. However, it is just as good with frozen broccoli in winter months. You can also use frozen chopped onions if you have those in your freezer. I kind of enjoy making this soup with sweet onions when I can find them. Of course, if you use olive oil and vegetable stock or water, this soup is an easy vegan recipe. My husband loves black pepper, so he always adds more to his soup, or sometimes he adds a little cayenne pepper to add some kick. I am sure there are several other spices that could be added to vary this soup, but I love the original recipe and rarely end up varying this soup!

Toothless_SignatureJaime

Orange Brownies

Orange_Brownies

Over the years I have become very good at altering recipes so that I can make them around my food allergies. Even though I can alter almost any recipe, often the best are those that don’t require any altering. I tend to get excited when I find something that I can eat right off the bat. How cool is it to find a brownie recipe that I can eat without any changes? These blond brownies are great because there is no chocolate or cocoa to try to substitute or eliminate. For me, it is exciting to find a brownie recipe that does not require any chocolate, since I have never had real chocolate and I am not a fan of cocoa or chocolate flavored baked foods. This wonderful orange brownie recipe originated from Paula Dean and the recipe can be found on foodnetwork.com.

Orange Brownies

1 ½ cups all-purpose flour
2 cups granulated sugar
1 tsp salt
1 cup (2 sticks) softened butter or margarine
2 tsps pure orange extract
1 tsp grated orange zest

Preheat the oven to 350 degrees and then grease a 13x9x2 inch pan. Stir together the flour, sugar and salt in a large mixing bowl. Add in the butter, eggs, orange extract, and orange zest. Beat until well blended with a hand held mixer. Pour the batter into the prepared pan. Bake for 30 minutes or until golden brown and well set. Allow brownies to cool completely before slicing into squares.

There is a cream cheese frosting that can be used with this recipe. However, I love these brownies just as is; they are plenty sweat and yummy without any topping or frosting. I am sure you could also use a simple butter cream frosting with a little orange flavoring if you really want to frost these beauties. I also highly recommend trying these brownies with a little bit of vanilla rice dream. Enjoy!!

Toothless_SignatureJaime

Fresh Tomato Soup

Tomato_Soup

Since dealing with cancer, I have become a lot more aware of the nutrition in foods. I have also had to concentrate more on packing all the nutrition that I can into any dish I make. I can only eat small portions of food per sitting, so for me it’s important to make every bite count. The one thing that seems to work very well for me is vegetable soups. Veggies can be difficult to eat because they take lots of chewing, or I have to cook them until they are dead and mushy which is no fun. Blended veggie soups are great, because it removes the chewing element and there is still all that great veggie nutrition and fiber. I shared my butternut squash soup earlier, and today I am going to share my version of a tomato soup (this original recipe was from Foodnetwork.com). This soup is great in the summer when tomatoes are cheap, or when your garden suddenly provides pounds of tomatoes all at once. Maybe the best thing about this recipe is that my husband, who hates tomato soup, really likes this one! It helps that there are several veggies in here, so it is not just plain tomato soup!

3 tbsp olive oil
1 ½ cups chopped red onions (about 2 onions)
4 carrots, peeled and chopped
1 tbsp minced garlic (3 cloves)
4 pounds of vine ripened tomatoes, coarsely chopped (5 large)
1 tbsp sugar
1 tbsp tomato paste
¼ cup packed fresh basil leaves (plus some julienned basil for garnish)
4 cups vegetable stock
2 tsp kosher salt
1 tsp freshly ground black pepper

Heat the oil in a large dutch oven, or soup pot over medium-low heat. Add the onion and carrots and sauté for ten minutes or until tender. Add the garlic and cook for a minute. Stir in the tomatoes, sugar, tomato paste and the basil. Add in the vegetable stock, salt and pepper. Stir well and bring the soup to a boil. Then lower the heat and simmer for 45 minutes until the tomatoes are tender. Process the soup with an immersion blender, normal blender or food mill, depending on how chunky or smooth you want your soup. Reheat the soup over low heat. Serve with julienned basil as garnish. You can also garnish and serve with croutons, fried onions or crusty French bread if desired.

This soup is wonderful with any kind of tomatoes I have tried. I usually pick whatever type of tomatoes look good in the store that week, whether that is vine ripened, roma or heirloom. I also tend to use whatever kind of onions I happen to have around, which can be yellow, sweet, Vidalia or red. Once the soup is blended it is also easy to add small soup sized pasta to add some extra nutrition and bulk to this soup. I love adding about ¼ cup of orzo or stelline pasta. Heads up, you may have to add a little extra stock or water if you add pasta. I love making this version of tomato soup because I know that it has so much more nutrition than a can of condensed soup (and it has less salt). I also love that I can get my husband to eat his one! ☺

Toothless_SignatureJaime

Olive Garden style Pasta Fagioli

Pasta_Fagioli

Everybody loves to eat out at restaurants. It is always fun when you can find recipes for your favorite chain restaurant staples. Plus, it’s so much less expensive to make your favorites at home, not to mention you can tweak the recipe and make it exactly the way you want it. I love these type of recipes because at home, I have complete control over what I put in a dish, and there is no dealing with special orders or seeing if the restaurant kitchen can even alter a dish to be say dairy free. With no teeth, I also find at home I have complete control over how well done or crispy items get, which is necessary in my life without teeth. I have found lots of my restaurant favorites are fairly easy to find online. The great tool that is Google makes it very easy to find recipes for lots of homemade versions of these yummy staples. One of my absolute chain favorites is the Pasta Fagioli soup at Olive Garden (when I can get it without cheese). This was a very easy recipe to find on Google. There were tons of different versions. This is my version that came from several different web variations that I have tweaked to be dairy free, celery free and heavy on the pasta (because that is my favorite part). With lots of practice making this soup, I have also gotten pretty good a making it easy to eat without teeth and most importantly without a blender!

2 lbs ground beef
12 oz chopped onion
14 oz slivered carrots
14 oz diced celery
48 oz diced or crushed tomatoes
1 14.5 oz can red kidney beans
1 14.5 oz can white kidney beans
88 oz beef stock (or you can blend beef and veggie stock)
3 tsp dried oregano
2 ½ tsp cracked black pepper
5 tsp chopped parsley
1 ½ tsp Tabasco sauce (Optional)
48 oz jarred spaghetti sauce
8 oz dry ditalini pasta

Start by browning the ground beef in a large soup pot (if you make this whole recipe you will need at least a 7 quart soup pot, an 8 quart pot if you like to use more liquid for a brothier soup). I usually drain the excess beef fat before proceeding. Add the chopped carrots, celery and onions and cook until they start to soften, about 10 minutes (I cook them for a lot longer until they are really soft and tongue squishable). Add in the tomatoes and the beans and mix well. Stir in the beef stock and the oregano, pepper and parsley. Bring the pot to a simmer and add the Tabasco if desired as well as the jarred spaghetti sauce (I like using a garlicy Prego) and the dry pasta (any small shaped pasta will work well here). Keep the soup at a low simmer and cook (stirring often) until the pasta and the veggies are tender, usually about 45 minutes. Serve with parmesan cheese for those who want to add it as well as garlic bread or breadsticks (I just use a little margarine and garlic salt on whatever bread we have or I use canned breadsticks). You can also add fried onion strings on top to give the soup a little crunch (I pass on the crunchyness).

This soup is so close to the Pasta Fagioli at Olive Garden and I love the ability to alter this delicious one pot dinner. I usually skip the Tabasco because it bothers my mouth, my husband will add a ton of Tabasco to his bowl anyways ☺ I also skip the celery since I am mildly allergic to it and picking the little pieces out of the soup later is annoying. I use a little more of the carrots and onions to make up for skipping the celery. I have also figured out that it helps to shred the carrots in the food processor and to dice the onion as fine as possible. This helps to get the veggies to cook so they are tender enough that I can gum them easily. A little warning, this recipe makes a ton of soup. My husband and I almost always halve the recipe for fear of having soup for weeks. We have tried freezing this soup and it does work great, and it’s super easy to reheat and use as a quick meal at a later date. If you halve the recipe we have also found that the unused half cans of beans freeze well in a ziplock bag for the next time. A general caution, the pasta will inhale and absorb lots of the broth, so if you like a brothier soup, be prepared to throw in an extra can of beef stock. If you happen to have fresh parsley, it is super yummy here and it makes a pretty garnish. And lastly, I am not a huge bean fan as they are a little tough to eat with no teeth. Occasionally I skip the beans all together and simply use 1.5 times the pasta. I would love to hear of other variations or add-ins that go well with this recipe. Please try this out, then share your variations here!

Toothless_SignatureJaime

Carbonara-Style Pasta

Asparagus_Carbonara

Carbonara-style Tagliatelle with Asparagus and Lemon-Herb Breadcrumbs

When I found this recipe I was super excited. Not only was it very easy to make this pasta dish dairy free (just skip the cheese), but it is a great recipe when I am in a hurry and just want a quick dinner. It is also very easy to make this dish soft enough that I don’t have to chew it a ton. I have used leftover asparagus and several different leftover proteins in this dish and it is always yummy (the photo above included left over ham steak and whole wheat fettuccine). I found this recipe on Foodnetwork.com and I have made it so many times, it has never been the same twice, but it’s always yummy!!

So here is the basic recipe:

1 pound asparagus, trimmed and washed
4 T extra virgin olive oil (plus extra to drizzle on the top)
Kosher salt
2 T butter or margarine
Grated lemon zest (2 lemons)
1 cup breadcrumbs
¼ cup finely chopped fresh chives
¼ cup finely chopped flat-leaf parsley
1/3 pound pancetta, chopped
1 tsp black pepper
4 cloves of garlic, grated
½ cup dry white wine
3 egg yolks
1 pound egg tagliatelle pasta (or any pasta shape)
1 cup grated pecorino cheese

Trim the rough ends off of the asparagus and lightly drizzle with olive oil. Grill the asparagus until lightly charred and tender, about 7 to 10 minutes. Cut into 1-inch pieces on an angle. Heat a large pot of salted water to boiling. In a small skillet, heat 1 T of olive oil over medium heat. Add the butter and heat until melted, then add in the lemon zest and breadcrumbs. Stir until moistened and golden brown. Then add in the chives and parsley and take the skillet off the heat. Heat the remaining three tablespoons of olive oil in a large skillet over medium heat. Add the pancetta and the pepper and cook for three minutes, stirring well. Add the garlic and cook while stirring for another 2 minutes. Deglaze the pan with the wine and turn the heat down to low. Lightly beat the egg yolks in a small bowl. Cook the pasta in the boiling water until al-dente (or until soft if you are toothless like me). Save 1 cup of the cooking liquid and drain the pasta. Beat the reserved water into the egg yolks to temper them. Add the asparagus to the pancetta mixture and heat through. Mix the pasta into the skillet with the asparagus and the pancetta mixture. With the heat off, pour the egg mixture over the top of the pasta mixture and toss for a minute or two. Here is where you add in the cheese if you like, I omit the cheese and simply put it on the table for those who want it. Put the pasta in a serving dish and coat with the lemon breadcrumbs, drizzle with a little extra-virgin olive oil if desired and serve.

The thing that I love most about this dish is that I tend to make it to use leftovers and it makes for a super fresh twist every time. I have used leftover asparagus many times. I have also served this with leftover parmesan crusted chicken for my husband to take for lunch. When I have leftover pork chops or ground pork and veal meatballs or leftover ham or ham steaks I love to add them into this recipe. When I have the last bit of a loaf of bread that is getting hard, I like to make my own breadcrumbs that I can use here. I have also made a small batch of this recipe when I have left over pasta that I need to use, any crazy shaped pasta will work. So try this recipe out, then try diggin’ in your fridge to see what you can add to enhance this in your own way!

Toothless_SignatureJaime

Dairy/Gluten Free Peanut Bars

CornFlake_Bars

When I was younger, finding really great desserts that were dairy free was always a challenge. We found a recipe for corn flake peanut butter bars that was awesome! This recipe is great because it is dairy free if you want it to be, but you can also add chocolate to these bars for those without allergies. This was always our go to recipe for when we were taking treats to school, Girl Scouts, church events and play dates. These peanut butter bars were always a big hit, whether they had chocolate chips, caramel chips, peanut butter chips or if they were plain. I also realized later these are gluten free depending on what brands of ingredients you use. These do have peanuts (lots of them!) so they are definitely not for those with peanut allergies.

1 cup light corn syrup
1 cup brown sugar
1 cup peanut butter
1cup peanuts (optional)
6 cups corn flakes

Optional:
6 oz chocolate or other type of chips
1 Tbsp veggie oil

Using a microwave safe glass bowl, combine the corn syrup and brown sugar. Heat in the microwave for 4-5 minutes until melted and boiling (you want the sugar to melt so the sauce is not gritty). Stir in the peanut butter until well mixed. Pour the liquid mixture into a large bowl with the corn flakes and peanuts. Mix to coat the cereal well. Press mixture into a well-greased 8×12 inch glass baking dish (this is a great job for little hands ☺). In a separate microwave safe bowl, combine the chocolate chips with the vegetable oil. Microwave for 1-2 minutes until the chips are melted and completely smooth. Spoon the chocolate mixture over the corn flake bars forming a nice even coating. Refrigerate for at least one hour until chocolate has set. Then slice bars to desired size. Store bars in a cool (refrigerated) place.

In our house we always halved the amount of chocolate chips and only coated half of the bars with chocolate so I could eat the plain half. Occasionally you can find dairy free “chocolate” chips and feel free to use these if you like. I did figure out recently that I could use carob chips in this recipe and they are quite tasty (but they can be hard to find and don’t melt as smoothly). You could also use nice dark chocolate bars for the topping if you are a dark chocolate lover. I also have recently started making these without the peanuts as I no longer enjoy the crunchy nuts because they are hard to chew (without teeth). I think my favorite thing about this recipe is that it is super easy and kiddo friendly if you have young ones who like to help in the kitchen. You can also put the mixture in greased muffin tins to make individual little bars. By putting out candies and other toppings these can be fun at a kiddo birthday party activity where everybody can decorate their own treat! Once they are chilled you can also use cookie cutters on these to make fun shapes. So try these out, then see what variations you can create and share them here!!

Toothless_SignatureJaime

Dairy-Free Green Bean Casserole

GreenBeanCasserole

After having a couple of weekends of cold and snowy weather, I found myself making an oven baked classic veggie dish several times. When it’s cold outside I love using my oven, both for the great smells and the extra heat that can help to warm the kitchen. Besides, on a cold and snowy night what’s better than a warm, bubbly and creamy casserole? Here is how I make green bean casserole so that it is both dairy free and soft enough that I can eat is with my lack of teeth.

1 (10 ¾ oz) can of golden mushroom soup (Campbell’s is easiest to find)
¾ cup of rice, soy, oat or hemp milk
1-1/3 cups French’s fried onion strings
2, 14oz cans of canned green beans, drained
pinch of black pepper to taste

Mix together the soup and the milk in a bowl. Add the pepper to taste (about 1/8th of a teaspoon, more if you like a little more kick). Salt is not needed here because of all of the salt in the canned soup and the canned green beans. Add the drained green beans and 2/3 cup of the fried onions and mix. Pour mixture into a 1 ½ quart oven safe casserole dish. Bake at 350 degrees for 25 minutes or until just bubbly. Top with the remaining 2/3 cup of fried onions and bake for another 5 minutes until the topping is just browned. Enjoy!

I have made this recipe with soy milk, oat milk and rice milk, all successfully. My husband and I found that soy milk always seemed to have some amount of aftertaste. I am pretty allergic to soy at this point so the rice milk is a safer alternative. Plus you can find rice milk at bulk stores like Cosco, and it stores at room temperature until opened. If you do not enjoy the texture of canned green beans, this recipe works well with frozen green beans. I prefer the nice soft texture of the canned green beans because they take less chewing. I love the flavor of the golden mushroom soup. It gives a nice hint of tomato to this casserole and it helps to thicken the rice milk. This recipe has become a staple at our holiday meals and on cold days. I hope you give this version a try!

Toothless_SignatureJaime

Potstickers

Potstickers

With all of my Dads’ family still living in Hawaii, we have spent plenty of time there over the years. I grew up enjoying the unique foods that are available there such as spam, plate lunch, saimin, Maui chips, and shaved ice. My favorite dish that I have learned how to cook is potstickers. I love that once you learn how to make them, you can alter them in any way you wish. They can be filled with savory or sweet items, and the potstickers can be steamed, pan fried, or deep-fried. Think of them as a pizza, where you can add any toppings and in any combination that you like. So here is the basic steamed potsticker recipe. (Steamed and soft potstickers are a great protein source for someone with a lack of ability to chew)

1 package won ton wrappers
1 pound of ground pork
4 green onions (white and green parts chopped)
¼ cup water chestnuts finely chopped (optional)
Small bowl of water

Won ton wrappers are fairly easy to find at most grocery stores. They come in round or square shaped. Try looking in the produce refrigerators or where the packaged tofu is located. Once you buy a package of the wrappers they stay good for a couple weeks so you do not have to use them immediately.

Mix the ground pork, green onions and water chestnuts until just combined. Here is the slightly tricky part, wrapping your potstickers. Using a cutting board or other work surface, lay out several individual won ton wrappers. Place about a spoonful of the pork mixture into the middle of the circle won ton wrapper. Then dip your index finger in the bowl of water and run your damp finger around the edge of the wrapper. Now fold one side over and seal the edges together. You should now have a half moon shaped potsticker. It will be able to stand up on its bottom with the sealed edge pointed up. If the wrapper does not stick together well you can use a little more water. If you are using the square won ton wrappers, arrange your empty wrapper with one corner pointed up and put your spoonful of meat mixture across the middle on the horizon. Run a dampened finger around the edges. Fold the top corner down to meet the corner that is pointed down. Then seal the two sides and curl them inwards. This should end up looking almost like a tortellini shape. Set up a pot with water and a steamer assembly (depending on your steamer container you may want to use a little bit of cooking spray to prevent sticking). Working in batches you want to steam the potstickers for 5 minutes or so, until they are soft and the filling has been steamed. It generally works well to form about 10 potstickers, start them steaming, and then form another set of ten potstickers so you can steam in batches. As you make the potstickers you will also get a feel for exactly how much filling you can put inside without suffering a potsticker blowout during steaming.

Serve the potstickers warm or at room temperature with a dipping sauce. A simple dipping sauce is soy sauce with chopped green onions (maybe add a little crushed red pepper for kick). Or you can use any store bought sweet and sour, or teriyaki sauce. Sometimes the Asian section of the grocery store will have specific sauces for potstickers. Experiment and find what you like! If you do not have a steamer assembly, you can cook the potstickers in a frying pan just as easily. Put a couple tablespoons of peanut oil (or vegetable oil if you have a nut allergy) in the bottom of a skillet. Cook the potstickers in the oil over medium high heat for about a minute. Then add about a half cup of water into the skillet and immediately put a lid on the skillet (watch out, there is a splatter moment here). Steam the potstickers for about 5 minutes. This cooking method gives a potsticker with some golden crunch on the bottom and a nice and soft steamed exterior. The last option is to toss the potstickers in a deep fryer set at 350 degrees until they float to the top. Remove them to paper towels to absorb the extra oil.

Once you have mastered making the potstickers, the fun of varying the recipe can begin. You can make vegetarian potstickers with a filling of finely shredded cabbage, carrot, onion, water chestnuts and green onion. You can make dessert potstickers by filling the wrapper with apple or cherry pie filling. Feel free to add cinnamon and nutmeg to the dessert versions. The sweat potstickers are very good deep-fried, they are like mini fruit pies. Try dusting them with powdered sugar, yum! For lower calorie potstickers you can substitute ground turkey or chicken in the recipe above. Use ground beef, refried beans and Spanish rice in a filling for a Tex-Mex version that is awesome deep-fried. You can do vegetarian Tex-Mex potstickers with corn, beans, rice and cheese. See what other versions you can think of and feel free to share!!

Toothless_SignatureJaime

Butternut Squash Soup

ButternutSquash

Since I have lost all my teeth, the thing that I am constantly missing in my diet is vegetable nutrition. Veggies tend to be hard to cook in a way that they are tender enough to be gumable but not so dead that you have a veggie paste. So, I have started making lots of pureed vegetable soups to get my veggies.

Here is one of my favorite veggie soups. This butternut squash soup has onions, carrots and butternut squash so it’s an excellent source of veggies. I found this soup recipe on FoodNetwork.com, and then altered it to fit my needs and allergies. I removed the cream and substituted vegetable broth for the chicken stock. So here is my version of this recipe:

2 T butter/margarine
2 T extra virgin olive oil
1 medium onion, chopped
1 large carrot, peeled and chopped
3 cloves garlic, minced
3 ½ pounds butternut squash, peeled, seeded and cut into 1 inch pieces
6 cups vegetable stock
¼ cup chopped fresh sage leaves (or a couple teaspoons of dried crushed sage)
Kosher salt and fresh ground black pepper to taste
Optional: ½ cup dry orzo or other small pasta

In a large soup pot (or I use my enameled dutch oven) combine the butter and olive oil over medium heat. Toss in the onion and carrot and let them sauté (I usually add a little salt here to help the onions sweat out and soften). Once the onions are soft and translucent add the garlic and sauté for another minute or so. Add in the cubed butternut squash along with the vegetable stock. Bring the mixture to a boil and add the sage. Boil the mixture, stirring occasionally for about 20 minutes. Turn off the heat and puree the soup. If you have an immersion blender you can do this step right in the pot. If you don’t have a stick blender (immersion blender) you can always use your normal blender in a couple of batches, just keep a towel over the blender top in case the hot liquid splatters. Return the pureed mixture to the pot over low heat to re-heat the soup. Add salt and pepper to taste. This is where you would also add the pasta if you want, and allow it to cook for another 15 or so minutes until the pasta is tender. I like the way the pasta gives the soup some extra body (and some extra calories). Serve the soup in bowls with a little chopped parsley on the top. Shredded parmesan cheese can be passed at the table if desired.

This is a great vegetarian soup, or it can be vegan if you simply omit the butter or margarine and just use olive oil. We serve this soup with good store bought Italian bread that has been topped with some olive oil, garlic powder and chopped parsley then heated in the oven. I heat my pieces only to get them warm, and allow the rest of the bread to crisp up for my husband who likes the crispy, crusty bread. Enjoy!

Toothless_SignatureJaime

Mac n Cheese

MacNCheese

Mac n Cheese. So I know it’s a staple in many households. It sure was in our house growing up, especially during certain times of the year when Fridays were supposed to be meatless. There are many ways to make this classic dish dairy free (not necessarily calorie free ☺). I am not going to give any recipes for macaroni and cheese. I know everyone has their favorite homemade version and when all else fails there is always a blue box version.

I will use the famous blue box version here. I am sure you could substitute a homemade recipe if you like. For a normal family of four where there is one dairy allergic person this will require about one half a cup of elbow macaroni (or other small pasta, you are just looking for about the same size pasta as that in the box so they all cook together in the same amount of time). We cooked the box pasta with a half cup of small elbow macaroni. After the pasta is cooked and drained we always pulled out one serving of pasta for me (maybe a large serving, because once the rest is cheezed there is no going back). My pasta got margarine to prevent sticking. The rest of the pasta gets made to the blue box directions. This is why we added the extra pasta. I know people like cheese, but if you took out one full serving of pasta and then made the cheese sauce, I hear it is death by cheese powder sauce ☺

As a family we always enjoyed adding other ingredients to mac n cheese. Our favorite was always diced Spam. Please, remember I have Hawaiian roots (and it really is tasty, just think of it as bacon). I love adding some protein to my pasta, and my family usually added the same protein. Spam, bacon, Portuguese sausage, Vienna sausages, hot dogs, pulled pork, mini meatballs, mini pepperoni and bologna are some of the meats I like to use. (My parents like canned tuna in with their mac n cheese, I just can’t do the seafood). Dice them up and toss them in with the warm pasta and margarine or olive oil and it makes a good meal (please be sure you are using fully cooked meats ☺). We have also been known to add some diced veggies to make a more complete meal. Cooked left over broccoli, canned green beans and black olives are my favorites. In our house it is also standard to couple mac n cheese with grilled cheese sandwiches. I love grilled Spam sandwiches and that is an easy substitution for grilled cheese. You can also do grilled bologna, ham or corned beef sandwiches. My sandwich always went in the skillet first (you know those grilled cheeses ooze sometimes). So there is a complete cheesy meal that can be made completely cheeseless! Enjoy!

Side note, I am also allergic to poultry. Spam lite has chicken added to it (that is how they make it ‘lite’). If you are allergic to chicken or poultry, always ask at a restaurant if the spam used is lite or not. We have found it in the weirdest places around Hawaii and I have had to get on the plane headed home, sick from a spam lite experience ☹.

Also for those of you with dental concerns for eating, this is a great toothless meal!! Spam is a nice and soft meat as long as you don’t crisp up the outside edges. Olives are gumable as is the soft pasta. The grilled sandwich is knife and fork friendly as long as you really watch it while its cooking in the skillet. Allow the sandwich to heat up but don’t allow the bread to really gain any color or become too crispy.